
DECOKE AND VALVE REGRIND TIME By Peter Lawson
How often do you need to decarbonize? I suppose it depends on the many variables attached to your type of driving but with modern fuels it should be less than the old days when as little as 8,000 miles may have been driven but perhaps as much as 18,000 miles. Driving around the relatively flat landscape of Essex you’ll probably not notice too much deterioration in performance but attempt some steeper hills in other parts of the country and a sluggishness and slight misfiring could point to the need for a decoke. This was the scenario I noticed in NiJella, our Ruby, when we crossed the Sussex Downs to Beaulieu. At one stage the misfiring was so bad climbing a hill that I had to stop. Changing the spark plugs cured the problem for a while but there was a lot of carbon on the old plugs which I had only recently cleaned so I decided it might be time for a decoke.
This was the first time the head had been off since Dave Orange had dismantled and reassembled my engine for a rebore and other repairs some 13,000 miles ago. It lifted off without too much effort to reveal quite a bit of carbon in the combustion chambers and on the valves. With pieces of rag pushed in the waterways and bores the top of the block was cleaned up with a scraper. For the top of the pistons I fashioned a scraper from a piece of alloy so as not to scratch the surface. A vacuum cleaner kept the loosened carbon from where it shouldn’t be. An inspection of the bores showed them to still be in perfect condition, testament to Dave’s rebuilding skills and of course changing the oil before and after every tour. Removing the manifold is necessary to get the valve spring compressor in place and once each spring is compressed the split collets are easily removed by using a telescopic magnetic pick up tool to attract each pair in one go. ‘Simples’.
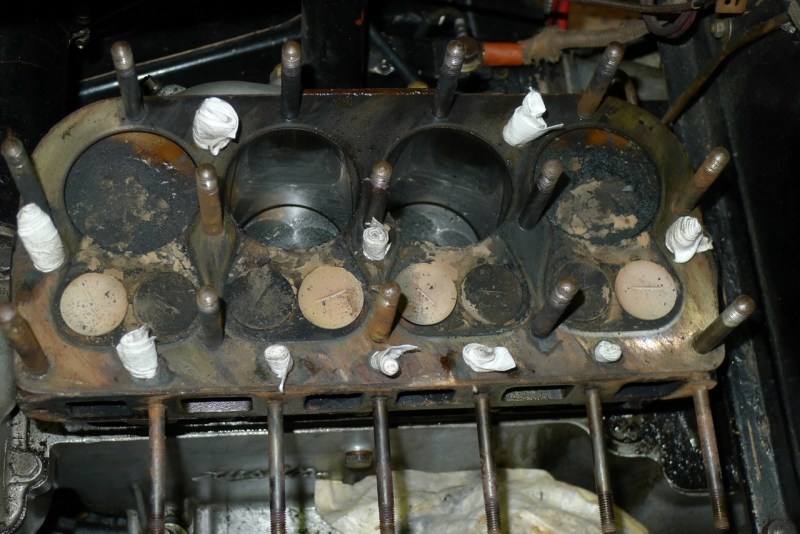
Make a wooden block with numbered holes to keep the valves in order as they are removed. I cleaned each valve up by using a drill press and fine emery cloth taking care not to touch the section that runs through the guide. The seats were a little pitted so these were ground in with coarse and then fine paste. Better than a stick with rubber sucker is to use a small battery powered screwdriver in the slot in the valve face. Easily switched from forward to reverse it is a hundred times quicker and easier. A suitable spring placed under the valve head will lift the valve off between directions simulating the old rubber suction grinding stick. Wipe the paste off each time to ensure it doesn’t get into the engine workings.

With everything cleaned up and SAE 40 oil wiped over the stems and squirted in the guides, which incidentally were still good, it was time to replace the springs and collets. I have double springs, all of which were checked for length against new ones first and also still good. Getting the springs and cups into position was a devil of a job owing to the slightly longer inner spring and after several aborted attempts I hit on the idea of a special tool using a piece of box section aluminium and a length of wood to slide within it. Hopefully the photo describes it better. Place the tool on top of the cam follower at a downward angle, slide the spring into its locating position along the tool, sliding the wood forward as you lift the tool up to the horizontal. When the spring is in position keep the wood against it whilst you withdraw the box section and hey presto. ‘Simples’.

Positioning the collets is another tricky procedure and I made a simple holder from a thin strip of aluminium quarter of an inch wide and a few inches long. With a semicircular bend in one end the same radius as a collet, they can be held in position with a dab of grease. Another dab of grease on the end of the valve stems will hold them in place before you release the spring compressor slowly ensuring each pair of collets settle evenly into the cup. Clearances were adjusted to 7 thou for exhaust and 6 thou for inlet; so much easier without the manifold in place. I will check the gaps again after a couple of thousand miles.
The cast iron head was easier to decoke with a scraper and wire brush in an electric drill and the face cleaned up with some wet and dry wrapped round a flat block of steel. With a new copper gasket smeared each side with LM or copper grease the head was lowered onto the studs, after a fresh coat of paint of course, and the nuts were tightened in the correct sequence to 20 lbs/ft, (I was going to do 25 lbs/ft but Dave advised against that much). A new manifold gasket and cork valve cover gasket were fitted and once all the ancillaries were bolted back it fired up first time. Fitting the square section cork gasket into a rounded recess isn’t easy and I ran the corners of one side of the gasket along a small drum sander fitted in the drill press. This sat more snugly and I smeared the cover’s recess with some Blue Hylomar, pushed in the cork, and then left it clamped overnight onto a flat block of wood. Next morning it was easy to offer into position without disturbing the gasket and without forcing the cover screws to flatten the gasket against the block.

The big test though was whether the performance had returned and a few days later we were on our way to join the Yorkshire Experience. A nine day holiday covering 1200 miles and several 1 in 4 hills including the infamous Park Rash testified to it’s success.
Footnote: During the work on the engine I noticed some disturbing end play at the camshaft pulley that had to be investigated. The problem was quite serious and will be detailed in another article

Download A7 Engine Diagram A7 Engine

You must be logged in to post a comment.